Friday, May 30, 2008

Recipe Using Mint

Yesterday morning I spent what SEEMED like a long time weeding out mint in a small garden area in our back yard. It had overgrown its boundary (or lack thereof). As you know, mint is a spreader and takes over any available non-toxic surface. If there were to be nutrients of any sort on the moon, I'll bet a great crop of mint would surface, given one sown seed.

GardenGuides says:
The common types of mint are peppermint, pennyroyal, crinkle-leafed spearmint, spearmint, and applemint. Never eat pennyroyal, as it is toxic.

Mint is a perennial herb that is propagated by root division or rooting cuttings in water. The plant is invasive and should be grown in pots or in lengths of plastic pipe buried in the ground. It enjoys a damp location, shaded from strong afternoon sun, and rich soil. Pennyroyal is an attractive addition to hanging baskets. Mint planted outdoors should be mulched heavily to protect against frost.

Well, given that information, why does my spearmint still prosper in soil that is not rich and is virtually unshaded?

The good thing about having all that green herb is that it smells tangy, and it tastes great in iced tea. And it is a key ingredient in a delicious main dish recipe which requires copious amounts of mint.

"Thai Beef-Mint Salad" recipe is from a book authored by Harry Kaiserian, a fellow traveler on a trip to Italy in 2001. He and his wife are from Maine and are excellent chefs. His book is entitled "The Best of K's Kwisine," published in 2001 by Penobscot Books, Stonington, ME.

This recipe can be made as "bar food" or as a main dish, which is light and filling during hot summer days. It is also nutritious and flavorful. The following page was copied from page 63 of Kaiserian's cookbook:

Hint: I make enough rice powder to be used for several recipes (stirring up about 1/2 cup at a time.) Also remember to buy large leaf lettuce, wash and dry before filling with this meat mixture.

And here is a picture of iced tea and mint I am currently enjoying. See the mint in the background?..wish you were here!
Thursday, May 29, 2008

Sewing Caddy

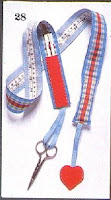
When knitting or sewing, it seems like embroidery scissors, a measuring device, pins, knitting bead markers, etc. never seem to be quite within easy reach. While browsing craft ideas, I came across a clever sewing caddy which could be made fairly quickly and inexpensively. When I saw the picture of this sewing caddy, along with a supply list and directions, I decided to make a similar one.

Here is what I found at the website Sewing:

Neck Ribbon Caddy Supplies:
1 1/8 yard (103cm), 1½” (3.8cm) wide blue plaid ribbon
1 1/8 yard (103cm), 1½” (3.8cm) wide blue grosgrain ribbon
½ yard (45.5cm) 3/8” (1cm) wide blue grosgrain ribbon
1 tape measure, 1 handful polyester stuffing, red felt scraps, embroidery scissors, thimble, sewing gauge

Directions:
1.Cut: Make a heart pattern. Cut one 1 1/8” x 4½” (2.8 x 11.5cm) pocket strip and 2 hearts from felt scraps. Cut 3/8” (1cm) wide grosgrain ribbon in 2 equal lengths. Cut tape measure off at 39½” (100.5 cm).

2. Assemble: Center and pin felt pocket strip to one end of plaid ribbon. Zigzag or use a decorative stitch along sides of felt pocket. Loop one narrow ribbon through scissors. Pin ribbon ends at raw edge of plaid ribbon and machine baste. Layer heart motifs together. Edge stitch, leaving 1¼” (3.2cm) top opening. Fold other narrow ribbon in half; center and tack fold to inside heart pocket. Center and machine baste ends to other plaid ribbon raw edge. Center tape measure on wide grosgrain ribbon. Edge stitch tape on all sides. With right sides together, stitch wide grosgrain to plaid ribbon with ¼” (6mm) seam across “heart” pocket end. Turn and press. With wrong sides together. Edge stitch ribbon sides.

3.Pin Cushion: Measure 4¼” (11cm) from open end, stitch across. Stuff tightly. Turn ¼” (6mm) raw edges inside and stitch closed.
I already had a small pincushion, so I did not need to make one. And instead of felt for the pocket, I had stashed pink flannel which I sewed on for a reading glasses pocket. The pink valentine heart bows were previously bought for my doggy, but she does NOT like to wear head ornaments. So I incorporated the bows as extra bling on the neck caddy.

The picture below shows supplies purchased for the project, and my resulting caddy is the bottom photo.

Now how neat is that?!

Wednesday, May 28, 2008

Memorial Day Birthday for Evan


My nephew's birthday party over the weekend...fun was had by all!

Tuesday, May 27, 2008

Make Fabric Switchplate Covers Fast

From Bella online:

Switch and outlet cover plates can be covered in fabric; just a very small fabric scrap works! Just use your decoupage skills to cover the plastic plates with fabric scraps.


Cut out your fabric scrap just ¼” larger than the outlet itself. Apply decoupage medium to the back of the fabric. Apply to outlet cover, smoothing out any wrinkles and turning edges to the inside of the plate. Let dry, and then add the decoupage medium to the outside of the plate. Once dry, cut an “X” in the rectangular hole for the light switch or outlet space, and turn to the inside.


From the inside cover use a small amount of hot glue to tack down these small turned in edges.


I made several (pictures shown)and liked the results. Small squares of fabric can be purchased at craft stores, or cut up bandanas or napkins in your favorite colors to cover switchplates. Kids' favorite critters or movie themes can be used as decorating sources for a quick, fun room accessory.

For the red switchplate, I took a photocopy of an oil floral and decoupaged it onto the switchplate using ModgePodge glue...a simple and colorful project!

Thursday, May 22, 2008

Away on Vacation

Have a nice Memorial Day Weekend. Be back on May 27, 2008...

Wednesday, May 21, 2008

Preemie Booties: Knitting for Charity

Charity Knitting: Preemie Booties

The pattern for these easily knit booties can be found at Silja's Booties.

I finished two pairs of these within a week while visiting family in Texas. The pattern is very easy, and the cotton yarn is elasticized, making for a comfy fit for babies.

These booties will be sent to the Denver Children's Hospital.

For more information about knitting for charity, and all the projects which solicit donations, there is an excellent website at Community Knitting for Charity. About thirty different organizations are listed there that welcome contributions. The website states that over 10,000 knitters are part of this effort.

As a part of the Yahoo groups, Socks for Soldiers, gives all information necessary for knitting socks for our troops.

Tuesday, May 20, 2008

Sewing Neck Coolers

Neck Coolers can be made for yourself or for our troops in service. This (highlighted) website has given the following information, along with a free pattern, downloadable to your computer:

Materials:
1 yd cotton fabric (at LEAST 42" wide) -- this will make 8 coolers
please prewash the fabric to remove any sizing
1/2 - 1 tsp polymer granules per cooler (see resource at end)

sewing machine or serger
--------------------------------------------------
helpful:

rotary cutter and mat (makes for quick cutting)

here are some objects that have been reported as useful when filling the pockets with crystals:

a 2 ft length of 1" PVC Pipe

a long-neck funnel (check your local auto supply store)
roll a sheet of paper into long tube

--------------------------------------------------

Cut or tear strips 4 1/2" wide by the fabric width (selvedge to selvedge). I usually use 45" wide fab, so I just cut them the width of the fabric -- 45" should be the max
NOTE: If your fabric is too wide (or not wide enough), purchase 1 1/4 yards and cut in the direction of the selvedge (from top to bottom) instead.

Fold in half, right sides together, on the long edge

Sew/serge the long seam and turn. Iron. As shown above, the seam has been placed in the center back, rather than at the edge. Now you have a tube about 2" wide and 40 - 45" long

Mark the center of the long edge and stitch across it. Drop in a scant 1/8 tsp of crystals on each side of the seam (I used Watersorb, make a test tie with the brand you're using to be sure this isn't too much/too little after it's soaked).

Mark 4 1/2" from the center seam and seam again.

Now you have 2 pockets with crystals.

Drop in another scant 1/8 tsp of in both sides and seam like before (4 1/2 inches from the first set of seams). You should have a total of 4 pockets.
NOTE: Some people make 2 pockets that are 9"/10" each, and some make just one 18" pocket. For longer pockets, adjust the quantity of granules accordingly.

Serge ends (or fold in raw edges and sew across) to finish ... I personally prefer the ends diagonal. THE SHIPS PROJECT: please tuck in and sew, do not just serge to finish ends.

Check the Watersorb site to order the crystals in bulk. I personally like this brand the best, it requires some 50% less than the brand I bought in the garden department. If ordering from Watersorb, order the "medium" granules.

NEW USE: The ShipsProject has received word directly from a contact at Watersorb® that cool ties made with Watersorb® brand crystals can also be heated in a microwave (once they have been soaked, of course). They will purportedly retain heat about 3x times longer than they will retain cold.

Please attach a care label:
immerse in cold water approx 60 min, until crystals become gel tie around head or neck;
regenerate by soaking 1-3 minute;
do not freeze;
dehydrate to store;
hand wash only, mild soap;
ties can be heated (briefly) in a microwave...take care when removing as they will be extremely hot!

Monday, May 19, 2008

Compression Sleeves - Lymphedema

For the past four years, I have been dealing with the after effects of surgery for breast cancer, mainly in the painful form of a condition termed lymphedema. From Lymphnotes Reference:

Lymphedema is abnormal swelling of the tissues with stagnant, and protein-rich lymph. This condition occurs when the lymphatic system has either failed to develop properly or has been damaged. When the arm is affected, a compression sleeve that covers the entire arm from the wrist to the shoulder is worn.

A recent Compression Blog says: For people with lymphedema, compression garments are vital. Lymphedema is a chronic condition that causes lymphatic fluid to build in the affected areas of the body. When ignored, dozens of pounds of fluid in the body can be created,leaving skin on the leg badly wounded (and leads to serious discomfort). Injury, ulcers, infections and, in rare cases, cancer may result. Sleeves are available in several styles design to hold them in place. Some have a silicone band around the upper edge to prevent sliding. When keeping the sleeve up in place, so it doesn’t constantly slide down, the solution may be a style that covers the shoulder and has a strap that goes across the chest.


For the first couple of sleeves that I purchased, the local durable medical supply office was the provider. Then I developed latex allergies from the bands on the tightest part of the sleeve, resulting in a weeping skin irritation. Just in time, a woman in the waiting room of the chemo infusion treatment area told me about Lymphedivas, a company which she had read about.

from The LDiva website:
Today, LympheDIVAs is dedicated to creating medically correct compression apparel for women with post-breast cancer lymphedema.

Rachel Troxell and Robin Miller developed lymphedema during their breast cancer treatment. Looking for a better way to deal with this permanent condition, they teamed up with Kristin Dudley, a fashion designer with a heart of gold. They conceived of LympheDIVAs as a way to make compression garments more fashionable, comfortable, and breathable, without compromising the medical utility.


I have been very satisfied with my newer compression sleeves, one in electric pink and one in a jazzy blue color, and am very glad they are 100% free of latex.

Check out their website if you know of someone in need of this product. My sister-in-law bought one yesterday after reviewing their information.

Friday, May 16, 2008

A Legend: Bone Woman

The following was written by Isabel Hoskins. She writes thoughtfully speaking through her poetry. You learn that she has come through a life changing battle with cancer. See her blog at Beyond the Map. This is Isabel's writing of BONE WOMAN:
This is the story, the legend, of La Loba, also known as the Bone Woman.

La Loba is an old woman who lives secluded in the desert mountains, a recluse who is fat and hairy and when she speaks she makes sounds like that of an animal more than human words. She keeps to herself and wanders around, waiting for lost people to come and seek her.

LaLabo’s work is to collect bones, mostly the collecting and preserving of bones that might otherwise be lost to the world. Her cave contains the bones of all kinds of desert creatures but it is the bones of the wolf she loves the most. She wanders about the mountains looking for her wolf bones and once she has the complete skeleton, she lays them all out on her cave floor, and sitting by her fire she begins to wait for the song to be birthed in her.

When La Loba is certain the song has come she stands over the bones, raises her arms in a dance and begins singing. As she sings the bones of the wolf begin to join together and grow flesh. She sings, as the animal inhabits fur and she sings, as the tail curls upwards and the wolf creature begins to breathe. She sings as the desert floor shakes and the wolf opens its eyes to life and with a leap, runs out of the cave and out into the desert canyon, howling its way through the mountains.

At some point in the wolf’s running, whether the splash of water from the river spraying over her or the glint of moonlight that comes to rest on the wolf’s fur, the bones that became the living wolf are transformed into a laughing woman who goes running towards the horizon.

And it has been said that if you are lost and wandering across a desert and it’s nearing sundown when the sun melts into the sky, that if you are lucky, La Loba may make herself known, revealing to you something long forgotten, something of your soul.

Thursday, May 15, 2008

Shepherd's Pie and Cookbook

Several years ago I came across a cookbook entitled Cooking for Madam, Recipes and Reminiscences from the Home of Jacqueline Kennedy Onassis. The author, Marta Sgubin, was John and Carolyn Kennedy’s Italian governess in the 1960's.

The book had great recipes, as well as lots of information about the Kennedy children and their upbringing. Both John and Carolyn (Kennedy) Schlossberg gave their permission for Ms. Sgubin to publish this book, along with the photographs of them as children.

Marta Sgubin came to the United States in 1969 as governess to Caroline Kennedy and John F. Kennedy, Jr. She regarded the move as temporary and was secretly planning to return to Europe very quickly.

After the children left for boarding school, Marta stayed on with the family. Her role, naturally, changed and evolved from governess to housekeeper and, finally, to friend, until she became an indispensable part of the household. She ran everything, but she shone especially as a gifted cook. Whether it was birthday parties for Caroline and John over the Thanksgiving weekend in New Jersey, a barbecue on the porch of the beach house on Martha's Vineyard, or a fast but elegant dinner on Fifth Avenue.

Twenty-five years later, when Jacqueline Kennedy Onassis died, Marta was still with her...from the cookbook (1999)

One of the recipes in that book was then "John-John" Kennedy’s favorite dish, Shepherd’s Pie. I copied that recipe and use it frequently for leftover pot roast, and when we occasionally have lamb left-overs. (My husband made Shepherd's Pie last nite; it was delicious.)

I could not find exactly the same recipe as is in Cooking for Madam, but one similar to Ms. Sgubin’s can be found here: Shepherd's Pie Recipe.

Just add a little dried rosemary, and it is even more fragrant and tasty!

PS: If you buy Cooking for Madam or anything through Amazon.com and use the link on the extreme upper right of this blog (web button with book image), the Ravelry organization gets a small cut from the sale. (Ravelry is a great tool for knitters and people who crochet, as well as for knittners.) Thanks for your support of Ravelry through this means.

Wednesday, May 14, 2008

Growing Geraniums (Or Not)

Geraniums are one of my fav flowers in backyard pots. Mixed with perennial groundcover, the splashes of vivid colors brighten up the entire area.

Each year, I have tried to “save” my geraniums over the winter. I have tried wintering the plants by hanging the bare roots in an outdoor shed (no luck). And I have tried several times trying to save the plants in the garage (also no luck). Maybe they did not get enough water, light or heat out there, or maybe they just did not want to survive.

But this year, lo and behold, one pot of roots that was relegated to our garage for the winter FINALLY made it! And it is large enough to make a visual impact this week in our potted plant area of the patio.

Gardeners often like to experiment and keep over their geraniums from year to year. This is possible by taking cuttings in late August and rooting them … Plants can also be dug, trimmed back to one half their original height, repotted and placed in a sunny window for the winter months. Some people also save geraniums by digging them, removing soil and hanging from the rafters in the basement on hooks. In general this method will work under high humidity, 85 to 90 percent and cool temperatures of 50 to 55 degrees F, but modern homes are too dry, thus causing dehydration of the plant. Because there is no sure way of knowing if this method will work in your home, try it and if successful you will have plants next spring.
This information is from Ohio State University.

We put out about a dozen new geraniums this spring. We’ll see if they can survive the summer of 2008 and into the winter of 2009!

Tuesday, May 13, 2008

Dyeing with Kool Aid

Kool Aid as a dye intrigues me. Kool Aid has many pleasing properties when mixed with sugar as a drink. But I never knew it could be used for dyeing purposes until I started researching a bit into the fiber world.

Each color of Kool Aid will produce a differing hue on yarns. One "color chart" of Kool Aid colors is shown in the picture at the left. It comes from this site.

I decided to dye some hand spun wool to see how it might work up. Of course, I Googled various sites and came up with this information from Knitpicks:

Getting started dyeing with drink mixes: All you need is a microwave, a selection of unsweetened powdered drink mixes, canning jars or microwave safe glass containers and small skeins of yarn. To get your yarn ready, wash it lightly in mild soap and then let it soak in the sink while you mix up your solutions.

Mix up your solutions: A good rule of thumb is 2 packages of unsweetened drink mix per 50 grams of yarn. Empty your packages of drink mix into your microwave-safe dish with some water. Stir to dissolve. Add your yarn and enough water to cover it. Heat and set your color. Zap your yarn-filled dish for two minutes. Let the yarn rest for a few minutes, then zap it again for another two minutes. Continue this process until the yarn takes up most of the color leaving the water nearly clear.

Finish your yarn:Let the yarn cool in the container. Then, rinse it thoroughly in water the same temperature as the yarn. Wash the yarn in mild soap, rinse again and let dry.


Ok, so after reading the above, I decided to do the dyeing in a simpler manner. I decided that blue would be a safe color, because any hue would turn out to be satisfactory for coloring wool. Here is how I did the dyeing:

1) Wet the yarn thoroughly (uncolored wool in picture at right);

2) Dissolve two packages of Berry Blue Kool Aid in about 2 qts. of boiling water;

3) Let the yarn soak in the Kool Aid for about 30 minutes. All the colored water is absorbed by the yarn, and the water has just a hint of blue left in it since all the blue dye is absorbed by the wool.

4) I put about a cup of vinegar in the rinse water, then wrung the rinse water out of the yarn;

5) Final step: I drained the yarn in a colander and let it set out to dry thoroughly.

The resulting yarn was a very nice blue! I can use it for scarf-making in the fall. And the whole process took less than an hour.

Monday, May 12, 2008

Bucket Hats - Art & Jazz Festival

Grand Junction, Colorado hosted their 20th Anniversary Wells Fargo
Art and Jazz Festival over the weekend.

Main Street comes alive with jazz music performed by local and national artists, artist demonstrations in a variety of mediums and artists selling beautiful, high-quality work. This three-day festival surrounds the re-installation of Art on the Corner sculptures. A celebration of art and music, this outdoor event features street vendors, live music, extended shopping hours with participating merchants and other fun activities.

One of the almost 100 juried art vendors along Main Street over the weekend offered handmade clothing products for children. All the items were reversible with different fabrics on each side.
Here is a contrasting vintage fabric bucket. How cute!! It has a Velcro bow attachable to either side of the hat. And it is just the ticket for my four year old grand niece in Texas.

If you would like to made a hat, a great website is this one: Hats. There are all types of patterns there that can be sewn, crocheted or knit. Be sure and scroll through to the last pages. Those last two pages have the pattern (downloadable to your printer).

And this picture is fabric and ribbon that I want to make up into a hat using a Butterick pattern. The material will be made into a similar one shown in yellow in the upper left corner of the photo. It is just one of those projects still on the drawing board.

Friday, May 9, 2008

Beading Necklace with Weaving Techniques


I enjoyed creating this jewelry last year, using beading and weaving techniques. Each jewelry item took me about a week to make, weaving and beading sporadically (who knows how many hours?).

Kits are available here Beaded Jewelry as well as many other places on the internet.

The pictured necklaces were made when I took a class at the Grand Junction Art Center last year. Patterns were furnished, as well as a supply list. The class was about four hours in length.

The necklace on the left used a heavier jute thread, and I embellished it with beads, and a plasticized orchid woven into the middle of the center piece. On the right, the purple waxed threads and blue accent beads were woven in a similar hemp using differing colors of lilacs and blues. Each is about 24 inches long, but can be customized to your desired length.

A reference search can bring up some easy learning tools so that you can make your own jewelry without going to a formal class.

Another website for making lariat necklaces can be found at Beadwork, as well as a supply list.

If you like beading, using the weaving method along with beading is yet another innovative way to used those pretty Swarovski crystals.

Thursday, May 8, 2008

Grand Junction Nursing Home - Therapy Dog in Training

Yesterday, Libby the Maltipoo pup and I went for our weekly visit to the nursing home. She is becoming a therapy dog, but must pass her certification in June in order to qualify her to visit in facilities as a certified Therapy Dog. Last week, I talked about Therapy Dog in Training.

What I would like to reflect upon in this blog post is the feelings and resulting life lesson which I experienced yesterday in our visit to the nursing home.

Yes, Libby was cute and engaging. And she was well mannered. But during our visit, the client's attention was mostly focused on her stuffed animal, a small dog resembling that of her pet left at home. That toy stuffed dog (I'll call him Rover) was kindly provided by a family member as an animal substitute because of the patient's confinement in the nursing facility.

Rover, of course, did not bark or move or ask for attention; he was void of any demands. The cloth dog just sat in the lap of the resident while she, the patient, focused all her attention on the inanimate object, crooning to the toy in a loving voice.

I came to understand in those few moments that although I was visiting her with my living, active, energetic dog, the client was directing her attention to Rover, lovingly positioned in her arms. She commented several times that that the dog was looking up at her adoringly. The woman, although only inches from active Libby, was caught up in her memories.

That stuffed animal must have brought to the client recalled times with her previous dogs, how she had showed them in competitions, and the care and love those pets must have been given her in her younger years. The bond between humans and dog is a strong one.

And therein, I learned a lesson. A therapy dog in the "here and now" is valuable in that it can bring much happiness while performing its work. But the working dog can also bring satisfaction to the patient in the evoked positive memories of a similar pet friend in past years.

It was a reminder to me that it is not about Libby, Therapy Dogs, or myself as an aspiring trainer, but that is about the patient with whom we are trying to connect. I believe we did just that yesterday, and I am thankful that Libby and I were allowed that privilege.

Wednesday, May 7, 2008

Beading: How to Make Earrings

An inexpensive and fun craft is creating hand-made earrings and necklaces using pretty findings and glass Swarovski beads. The glass beads are my favorite because they reflect light and have a nice sparkle.

To the right are about a dozen pairs of earrings that I made and wear often.

It is easy to make earrings, necklaces and bracelets with just a few tools and different colored beads and silver accessories that are found in abundance on the beading aisles at your local craft store. The internet is a great source for finding beads, too, and if your order includes the T-pins and earring hangers, it usually pays to purchase from an outlet.

While traveling, it is fun to scope out bead stores in other areas. Bringing back beads from a different locale and using them in making jewelry reminds me of the place where the beads were found.

Here is a quick tutorial on making some crystal earrings that explains how easy it is to make earrings, step-by-step from Karla Schafer, Auntie's Beads Designer, on YouTube.


Give it a try, and you will probably end up with a huge stash of pretty beads. And your local craft store will love you for your shopping!

Tuesday, May 6, 2008

National Teacher Day Appreciation

National Teacher Day
Tuesday, May 6, 2008
Great Teachers Make Great Public Schools

The National Education Association (NEA):


On National Teacher Day, thousands of communities will take time out to honor their local educators and acknowledge the contributions they make to our lives. Our Teacher Day annual theme has been replaced with a standing tagline, "Great Teachers Make Great Public Schools," and draws attention to the crucial role teachers play in making sure every child receives a quality public education and conveys the hard work they do each day to make public schools great for every child.


Together with the Parent Teacher Association, NEA is collecting thousands of teacher thank you cards and combining them into a larger-than-life mural. Be a part of this one-of-a-kind project! Visit Thank You and add your card.
"A teacher affects eternity; he can never tell where his influence stops."--Henry Brooks Adams

"Teachers, I believe, are the most responsible and important members of society because their professional efforts affect the fate of the earth."--Helen Caldicott, author and peace activist

More quotes can be found at Teacher Quotes. You might want to slip a thank you note into your child's notebook today just to tell them you appreciate their teaching abilities.

Visit NEA to learn more about the issues educators are facing as they do their work and meet the requirements of many laws and regulations.

You rock, teachers! Thank you!

Here is a great video: "Shift Happens - Globalization; Information Age"

Monday, May 5, 2008

Cancer Support, Knit Dolls

These little knitted dolls are uplifting give-aways for women who are undergoing treatment for cancer. Cleverly hidden inside their tube legs are pipe cleaners which give them flexibility to sit on their own. Notice that the arms can be crossed in the manner of the ribbon associated with fighting for a specific cause.

Actually, I have knitted these up in several colors for patients undergoing treatment for various types of cancer.

The American Cancer Society (ACS) has linked 22 different colors to different cancers. For instance, bladder cancer is associated with the color of yellow, while pancreatic cancer is associated with the color light purple. For more information, see ACS Colors.

The pattern for these dolls is given in an excellent book entitled The Natural Knitter. Barbara Albright is the author (2007), and I purchased the book from Amazon.

These little dolls are fun to make, and the women who receive them seem to be genuinely delighted when given one. If you would like directions for these knitted dolls, leave me a comment and I will furnish step-by-step directions for making them.

Sunday, May 4, 2008

T-Shirt Wrap for Asus Eee PC

Now that my little Eee and I will be traveling together, it needed its own wardrobe. So I went to Makezine for some information about sewing a laptop case.

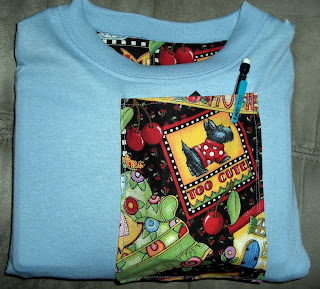
The one shown here was not very attractive, so I made one up from a $3 child's T-shirt and scrap material.
I lined the t-shirt with a fun fabric , inserting toweling as extra padding, and made a pocket from the same material. The pocket holds the laptop mouse and a pen and paper. The inside of the padded T-shirt contains the Eee PC for storage.

This picture is the end product for my blue cover laptop. It just HAD to match!

Friday, May 2, 2008

Socks Finished!


Yea! I finished my husband's socks. And it was just in time for hot weather...those wool socks will get moth eaten before he ever puts them on!
The yarn was a bit too large, and the socks seem a bit roomy, but maybe with a hot water wash....

Asus Eee PC

Yesterday a small package arrived by UPS which I was eagerly anticipating. In it was an Eee computer weighing only two pounds.

Their Website says:
The Eee PC is here, bringing a whole new, highly mobile Internet experience. For starters there’s no technical manual. Buy it, take it home and the Eee PC works right out of the box! It’s so user-friendly, even a Newbie can get started right away. Mobility is another key feature of the Eee PC. It uses Solid State Disk (SSD) technology which provides for energy savings and quiet, shock proof, stable computing. The Eee PC is therefore the perfect tool for the outdoor enthusiast or any active person on-the-go. Weighing in at a mere 1kg, the Eee PC is an impressive little titan for school, work, or vacation.
Eee stands for “Easy to Learn, Easy to Work, Easy to Play". I watched a video prior to purchasing the Eee machine which was a concise review of the product. (Almost half a million people have watched this YouTube video.)


Specifications
Internal memory: 2 GB solid state disk
Memory expansion: slot for MMC/SD(SDHC) cards
RAM: 512 MB DDR2
Processor: 800 MHz Intel Mobile CPU
Operating system: Linux (supports Windows XP)
LCD: 7 inches, 800 x 480 pixels
Networking: 54g Wi-Fi (802.11b/g), 10/100 Fast Ethernet
Peripheral connectivity: three USB 2.0
External video: one VGA
External audio: one headphone and one microphone port
Webcamera: no
Battery: 4400 mAh
Battery life: up to 2.8 hours
Weight: 2 pounds (32 ounces)
Dimensions: 8.9 x 6.5 x 1.4 inches

For under $300, including shipping, this little jewel is going places with me! Sure, it has a small 7” screen and a tight keyboard, but I will not be using it as my primary computer.

I bought it with a light blue cover, and naturally, it needed its own little case! So I am sewing the small computer her own travel wrap. More about that tomorrow.

Thursday, May 1, 2008

Therapy Dog in Training

Libby Sweetpea the Malti-poo graduated from obedience school this week! A picture of Holly, dog obedience instructor, and Libby shows that the pup is quite proud of herself. Can you see it in her expression? Ok, maybe I am being a bit anthropomorphic, but I SWEAR that every dog receiving their graduation certificate was pleased with themselves and loved the applause from the audience!

We continue training at home (I must admit I am a bit lazy about it as far as the amount of time we spend in collar training). AND, we went to a rehabilitation facility yesterday so that Libby could get used to being around people in wheelchairs, as well as a medical environment. It was a “supervised” visit with Cathy, our local person who performs dog evaluations and certifies dogs for the Therapy Dog Program. (Also see my posting on April 7, Crafting Good Behavior regarding therapy dogs.) Cathy and her two dog assistants showed us the ropes for patient visitation.

I made some calling cards for Libby to leave with her visitors when she goes out in the future. It has her picture on it and says in a GIANT FONT: "Hello, My Name is Libby Sweetpea".

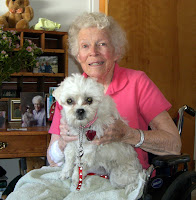
Here is Libby and her dog lover new friend she met yesterday at the rehab facility.

Once Libby Sweetpea is certified, then she and I can go out on our own for other visitations. In the meantime, we will visit this same lady (with Cathy and her dogs) next week.

Here is a good link for all kinds of information you might be interested in regarding dogs: Dog Logic.